| This Kit is Suited to the Following Models: |
| Nissan S13, S14, S15 |
| Nissan Skyline R32 GTS-T |
| Nissan Skyline R33 GTS-T |
| Nissan Skyline R34 GT |
Disclaimer
Modifying vehicles is a specialist task and requires the knowledge and experience of competent individuals to be conducted safely. We recommend this product be installed by a competent person. If you require further assistance: Go to the Contact Page
Note that this particular set of instructions is done on the Silvia, but the same process applies to the Nissan Skyline.
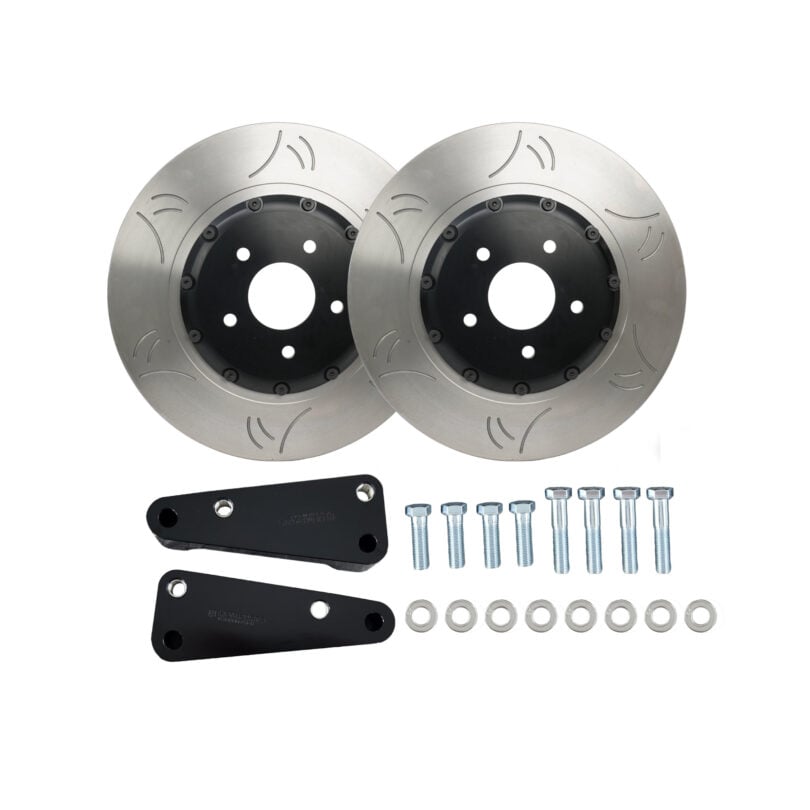
What’s Included
SKU: RSBREM354
- 2x HFM.Parts Caliper Adaptors
- 4x M12x1.25x40mm Hex Head Bolts
- 4x M12x1.25x55mm HexHead Bolts
- 8x Flat Washers
- P/N: RSBREM354-L & RSBREM354-R
SKU: RSBREM354-K
- The Above Plus:
- 1x Pair HFM.Parts 354mm Front Two Piece Rotors
- 1x Set of HFM.Parts Front Braided Brake Lines (Optional)
Special Tools Needed
- There are no special tools required.
Installation Steps:
Step 1: Remove Existing Components
Lift the vehicle and remove the front wheels.
Detach the brake calliper and remove the brake rotor from the front knuckle.
Remove the brake line and calliper now, or remove them towards the end.
You may also need to remove or modify your backing plate.
IMPORTANT: Before you begin installation, make sure the hub face assembly is clean of dirt, debris and rust particles. Failure to do so will cause rotor runout and hinder your brake pad bedding-in process. There are many ways to clean your hub face assembly; we like to use a wire brush and sandpaper with some brake cleaner.

Step 2: Attach Calliper Adaptor Bracket
The adaptors are labelled as follows:
RSBREM354-L & PSBREM354-R.
L – Left Hand & R – Right Hand.
Bolt the Adaptor to the inside of the knuckle as shown using M12x1.25x40mm hex head bolts and washers supplied in the kit and torque to 58-62 ft/lbs. Use LockTite 242 or an equivalent for all bolts. *Photo shows cap head bolts for demonstration only. Please use supplied hex head bolts.


Step 3: Install Rotor and Brake Calliper
Install the rotor, holding it in place with a couple of lug nuts.
Install the Calliper with the remaining M12x1.25x50mm hex head bolts and washers, and torque both bolts to 58-62 ft/lbs. Use LockTite 242 or an equivalent for all bolts.


Step 6: Install Brake Line
Your OEM brake lines will be at full extension when using this adaptor/brake kit. We highly recommend using HFM.Parts Front Braided Brake Lines, with options for both S and R chassis.
Position the brake line carefully to avoid contact with moving or sharp components.
Secure the brake line clip back into the mounting blocks and clip it in place.
Step 7: Install the Brake Pads
Slide the brake pads into place and insert the two bridging pins.
Lock in the bridge pins with the metal R-clips.


Final Checks
Double-check all bolts and fittings for tightness.
Ensure the brake lines are not rubbing against any components.
Bleed the brakes to remove air from the system.
Perform a test drive at low speeds to verify proper braking function.

